How to Develop Gltf 3D Content for p3d.in in ZBrush
ZBrush is a digital sculpting tool that provides 3D artists and animators with the power to create works of art displayed in real-time with no restrictions.
This allows you to use your imagination, sketch ideas directly into the virtual world, refine it instantly, and make changes without ever starting over.
Users can sculpt any type of clay-like material in real-time, allowing them to easily modify their projects on the fly with tools designed specifically for this purpose. Users can create characters, creatures, and anything else they need, whether they are working on a museum exhibit, building a game, building props and maquettes, creating pieces for jewelry, toy collectibles, advertisements, automobiles and more.
The core toolset of ZBrush is designed to provide artists with the power they need to create concept art and models for animation while still providing them with the flexibility they need to produce final work.
ZBrush is more than just another digital sculpting application. It is a new way to create and design. Now you have no excuse for not creating epic art!
ZBrush combines the familiar Photoshop interface with the benefits of working in three dimensional space. ZBrush has standard painting and sculpting brushes, while its interactive sculpting and painting tools give users the ability to work dynamically without having to toggle back and forth between modes. This allows you to focus on art creation and lose yourself in the process as you create your own imagination.
With our ZBrush GoZ exporter, you can export a glTF model to import it into any other application such as the p3d.in 3D model hosting and visualization framework.
This tutorial is about the basics of PolyGroupIt in ZBrush. As you can see from the name, PolyGroupIt is all about grouping objects together, and therefore any serious modeler needs to understand this tool.
3D models can be exported in numerous file formats including glTF (.glb), and .obj for easy upload of 3D models on p3d.in to instantly share your 3D models online.
ZBrush Interface
The ZBrushCore interface is intuitively designed so that you can easily access the tools you need. On the left side of the screen are the "Selector Thumbnails" that show details of what is currently selected. The Menu Bar is located at the top-most part of the screen, and this is where you will find access to most of the tools in ZBrush. The items on the Menu Bar include "Alpha", "Brush", "Document", "File", "Edit" and so on.
The wide center of the screen is the "Viewport" where you can view your 3D model as you sculpt and manipulate its form in real-time. The "Lightbox" is a very important tab in ZBrush and can be found at the top left corner of the screen, above the Viewport. This is where you will find numerous subtabs comprising of different commands. These commands are needed to create characters, environments, alter materials and so on. You can explore the subtabs located at the top of the "Lightbox" drop-down panel.
On the right side of the Viewport are navigation and display buttons. The top of the screen has "Mode" buttons, and above those are main palette buttons. The tools on the panel at the top, and the ones along the right side of the Viewport are useful to create and manipulate your 3D models. The "Tool Palette" in the right tray also provides access to 3D and 2D tools for artists and modelers alike. These include Primitives (mathematically created shapes that you can adjust) and ZSpheres (a unique creation tool) for creating shapes and geometry.
Hovering your cursor over any icon on the interface while holding the CTRL key will display information about the icon and what it is used for.
Creating a 3D model using ZBrush
To create or sculpt a 3D model, Navigate to the top left part of the screen and click on "Lightbox". On the drop-down panel, select "Project" from the subtabs arranged side-by-side at the top of the panel. Here, you will be presented with different shapes and presets with different attributes. You can start by selecting any shape of your choice and sculpt them into desired form. You can also find base character models and mannequins here.
To select a sphere for example, click on the "Sphere" thumbnail in the Lightbox panel and it will be placed in your Viewport. On the right end of the Viewport, you will find a panel filled with tools you can use to navigate the Viewport such as Move, Rotate, Zoom, Perspective etc.,
To sculpt, you can either add to the base "clay", or subtract from it. To add, move the cursor to the part of the object you are sculpting, and click and drag as desired. To subtract, hold the ALT key, and click and drag to create a form you desire.
In the panel above the Viewport, you can adjust attributes such as the "Intensity", "Focal Shift" and "Draw Size" of your brush with the sliders.
To activate or deactivate "Symmetry", navigate to the Menu Bar and click "Transform". At the lower part of the drop-down menu, there is an "Activate Symmetry" subtab where you can choose a desired symmetry type to use. To soften the contours created by sculpting, while holding your click, hold down the SHIFT key and move your brush over the region you want to soften.
Adding material and texture to 3D model
Adding a material is quite direct in ZBrush. To add a material to your object or model, on the "Tool Palette" on the right side of the screen, click on "SubTool" to expand the subtab to reveal different components of your model.
Select from the list the component you wish to apply a specific material to, navigate to the left side of the screen, and click on the "Material" tab right over the Color Gradient box. A fly-out menu containing different materials represented by little thumbnails previewing how exactly each material would affect your model will be displayed. Select a material of your choice. The material selected will be applied to your entire model.
To ensure the material is only applied to the component selected, navigate to the panel above the Viewport and activate "Material Mode" by clicking on the tab labeled "M" at the center of the panel. Next, move your cursor to the Menu Bar and click on "Color". From the drop-down menu, select the "Fill Color" option at the bottom. The material chosen will now be applied to the component selected. This process can be repeated for different components of your 3D model.
Before applying texture to your model, ensure it has been properly "UV mapped". Go to the Tool Palette on the right part of the screen, scroll down and select "UV Map", alter your UV map size as desired depending on the size of your model, select from the list of options under "Create" such as "Uvb", "Uvc" etc. If needed, you can adjust the sliders of other properties until a desired result has been achieved. In the "Morph UV" subtab, you can unwrap the selected SubTool into the UV layout to see how the UV is laid out on the mesh.
To apply texture, select your object, navigate to the "Tool Palette" and select "Texture Map". Click on the empty box to select from the list of previously loaded textures and textures available in ZBrush. You will see your texture map loaded into the previously empty box. Now your texture should reflect on your UV mapped model. You can download textures from Pixologic Texture Library and import them to be used on your model. This can be done by navigating to the Menu Bar, selecting "Texture", and from the drop-down menu, click on "Import". Locate the texture map to be imported and double-click on it to successfully import it into ZBrush. Now you can select the texture from the "Texture Map" tab in the Tool Palette.
Export To glTF
There are some restrictions on the export of the glTF format. You can export transparent plastic material by using the diffuse color only.
When you export a glTF model from this application, you can import it into any other application that supports the glTF format, such as the p3d.in 3D model hosting and visualization framework.
Ready to export your model? Click File, then export. Choose a file type from the dropdown menu, give it a name and location, and click Save.
Unit size: If a scene is not utilizing scene units, it is best to set the unit size because it tells the program how big your geometry should be in real-life measurements.
The texture resolution in dpi: Texture resolution in dots per inch (dpi) varies for each part. The higher the dpi, the crisper your textures will be. However, your file size will also increase if you use a large dpi.
Ambient occlusion: The baked texture will include it when you turn on ambient occlusion.
Use Draco to compress the geometry: Compressing a scene using Draco will significantly reduce the file size of the geometry but will not affect texture quality.
The number of samples: A low value will result in an image containing excessive amounts of noise. Raising the value of a commodity increases its time to export it.
Please choose only one option (Geometry Nodes or Textures): It is impossible to apply both Geometry nodes (bubbles, flakes, displacement) and textures on a single part. This decision will determine whether you prioritize the effects of one type over another.
Optimizing and exporting your 3D model for upload on p3d.in
To upload your 3D model on p3d.in, you can either place your .obj file, .mtl and all texture files used into a single ZIP folder, or select the files together with all texture files used (.png, .jpg, .gif) when loading them onto the interactive viewer on p3d.in. The .obj file contains all the geometry data of your 3D model, and the .mtl file format contains the material details of your 3D model.
Other supported file formats are: GL Transmission Format .gltf/.glb, FBX (Filmbox) .fbx and STL format (.stl).
p3d.in is a platform where you can instantly share your 3D models online and in Augmented Reality (AR) in real-time.
Before exporting, ensure your document size is right for your export. To do this, click "Document" on the Menu Bar, and from the drop-down menu, input the document size you want in the textbox at the bottom of the drop-down menu.
To export your model, select the object you wish to export, navigate to "Tools" at the right top part of the screen and select "Export" from the options. The "Export" window will open. Name your file, and choose a file format and desired file location to save your model. The export file formats supported by ZBrush include but are not limited to .obj, .fbx, .stl. For upload on p3d.in, all three formats are supported but the .obj file format option is recommended.
Now that your 3D model has been exported, you can go ahead and upload it on p3d.in
The ZBrush Plugin: PolyGroupIt
Seed Points and Polygroups
In the most simple form, PolyGroupIt is a Node Editor Brush. The brush picks first on the seed point, which the brush will use as a pivot or center of the brushstroke, then it moves outward and selects additional pieces of geometry.
In more technical terms, it divides a surface into separate regions (polygroups) based on adjacency to previously chosen geometry. Then per polygroup, it deletes the unselected faces keeping only those faces fully inside (and adjacent) to previously selected ones.
PolyGroupIt uses an algorithm inspired by a desktop application. This application offers more control for advanced users, but because it doesn't display all the polygroups or let you edit them, you can still consider this a "Brush Tool" and not one that "Creates Groups."
The Workflow Process of PolyGroupIt
PolyGroupIt is a workflow plugin that takes advantage of the ZBrush-specific workflow. You start with a single seed point, then create new polygroups automatically by clicking on the geometry.
You can create multiple polygons at once and control their number of divisions. The polygons are distributed over the entire object in a balanced way to keep your geometry perfectly smooth.
Polygons are created evenly around the seed point. You can do the distribution without increasing the total number of points and check the density at any time.
Symmetry
The seed point is the origin or starting point for any operation within the polygonal domain. In a polygonal model, basic symmetry properties can be applied to the model when using a seed point.
A system for rotational symmetry around an axis through polygon vertices is applied by placing a seed point in the Object menu.
Polygroup symmetrical groups consist of multiple identical objects as clones and will be treated as one unit on the various operations.
Symmetry is an artistic skill that consists of creating an expression, a shape, or something else with two different elements opposite or very similar. Symmetry is supported in the visual arts, especially when it comes to 3D art.
It's about dividing the artwork into two different parts, the left and the right. Mostly symmetry is used for composition purposes by arranging a design to avoid chaotic elements that would destroy the art's expression.
The Basics of PolyGroupIt
This tutorial will look at the polygroup feature found within the plugin. The polygonal modeling tools in ZBrush allow you to perform tasks such as sculpting, boolean operations, and most recently, with the addition of the PolyGroups feature (introduced in version 4), mesh creation.
If you want to be a good sculptor, you're going to want to get good at using polygroups. They're those shapes in ZBrush with an eraser brush but also show up individually in your layer slider list. That's what are called polygroups. Below is the z plugin menu.
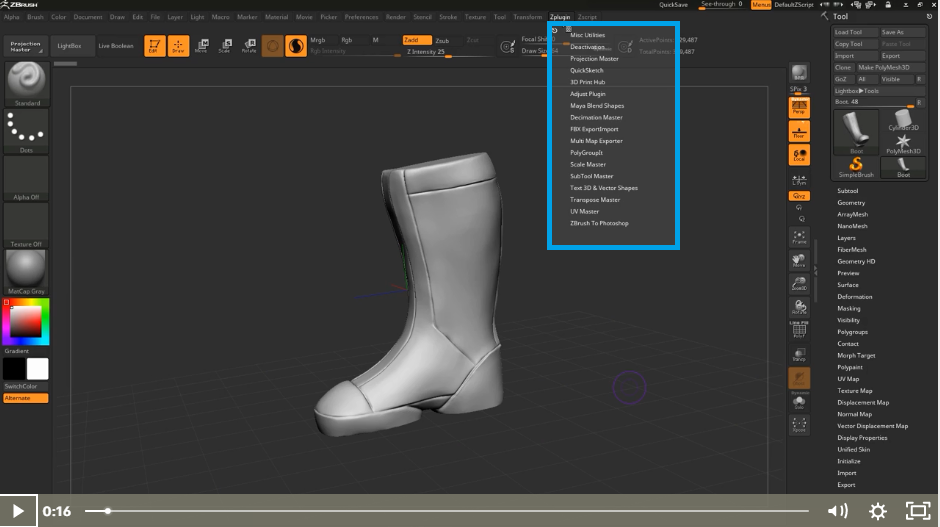
ZBrush has some great tool manipulation options built-in. For example, there's a little pop-out menu to the right of the Z plugin that allows you to load various plugins. You can load additional brushes and open up plugins to customize the user interface.
This tutorial will dock our z plugin menu by clicking the icon in the top left corner and dragging it over to the right tray.
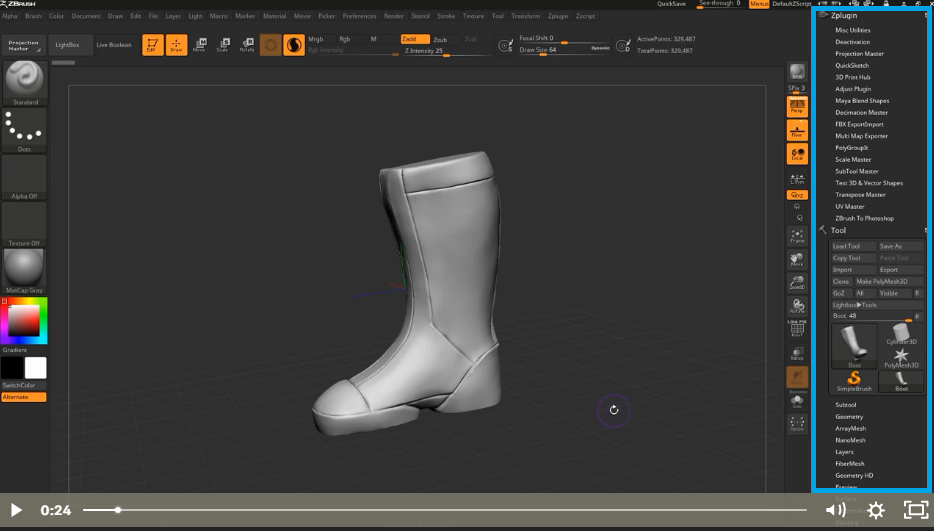
You will find the poly group about halfway down the Z plugin menu. You're going to click that open, and you'll notice that there are three buttons: polygons, polygroups, and polypaths.
These are currently used for working with polygon meshes, so you're not going to worry about them right now. However, let's talk a little bit first about polygroups themselves.
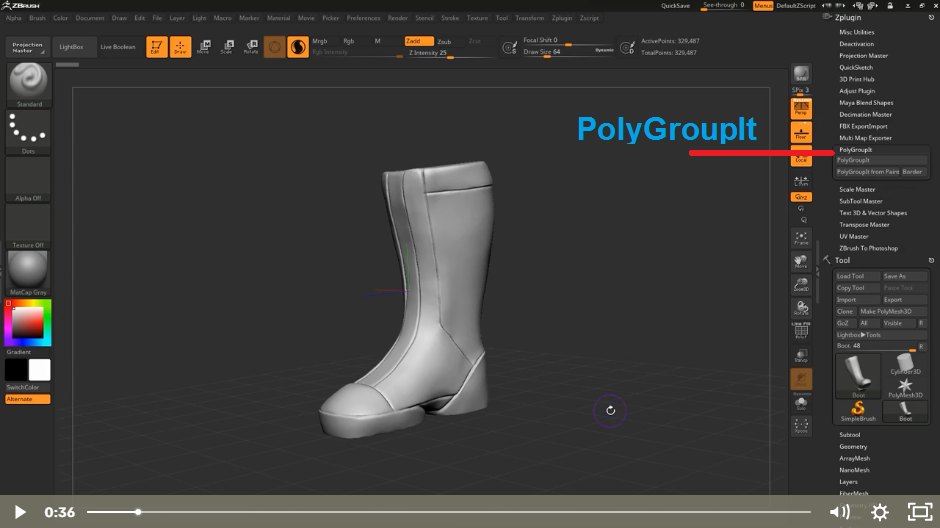
Clicking Shift-F will show the polygroups assigned to the small boot. You can see that there is only one polygroup set to this particular boot.
While creating this boot, we made sure each object was separate without too many polygons. This method will allow for easier manipulation and cleanup later on.
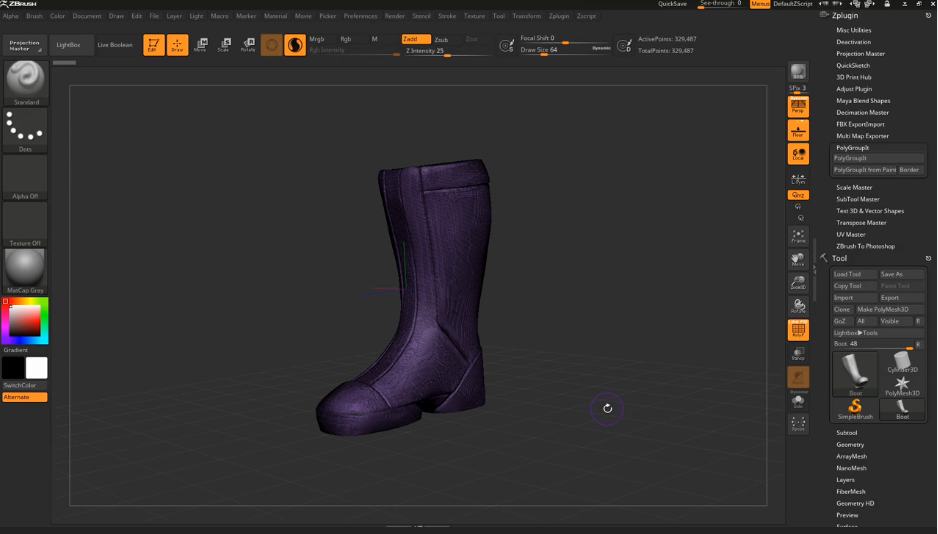
One of the most effective operations in ZBrush is the PolyGrouping function. Press the PolyGroup button on the right side of your screen to bring up a menu with several different groups of polygons you can use.
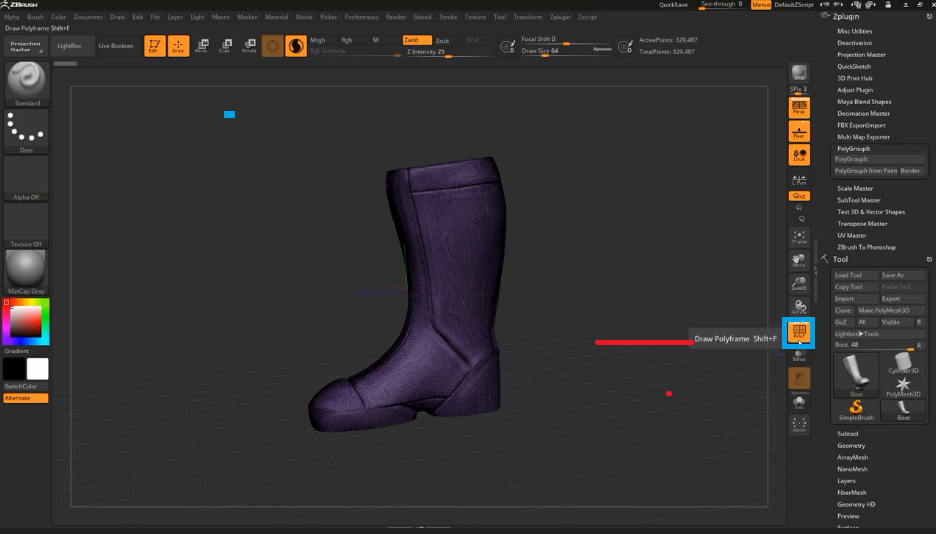
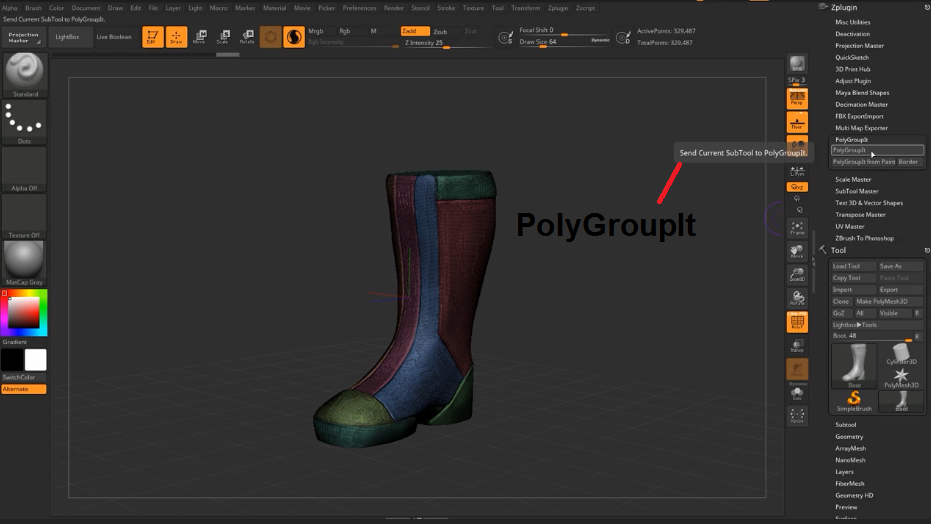
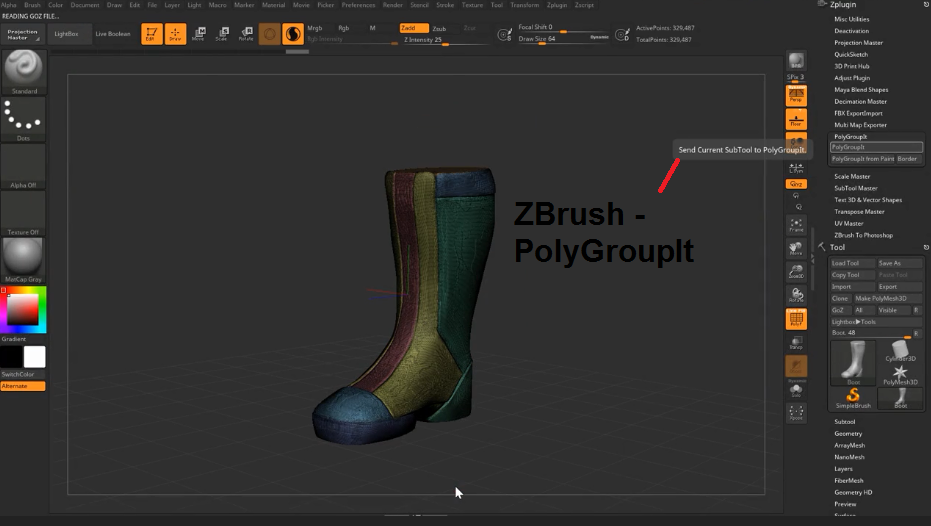
So now that you have only one poly group - the default group - let's use PolyGroupIt to assign the new poly groups by clicking on the image surface.
PolyGroupIt handles this by analyzing the surface and limiting the poly grouping based upon change. It will look at both elevation changes and changes in the curvature of the surface. So, let's go ahead and click on PolyGroupIt now.
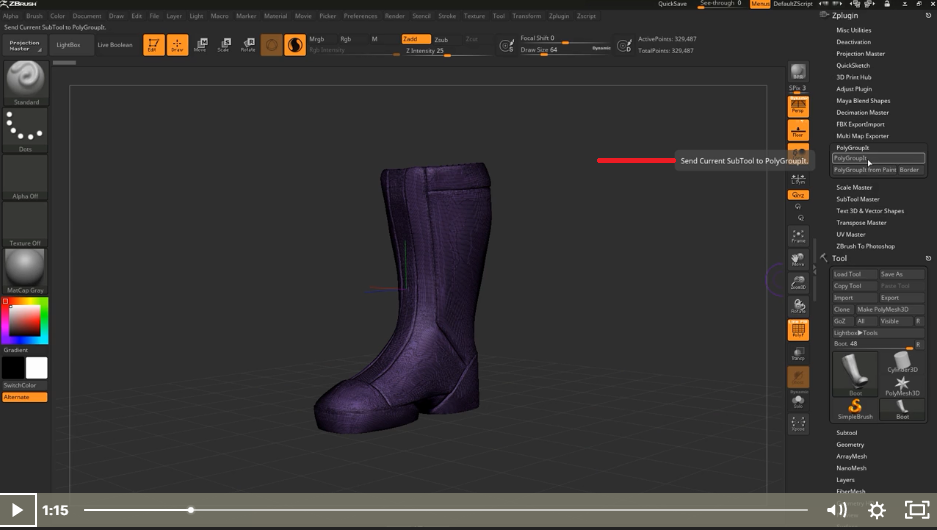
As soon as the boot appears inside PolyGroupIt, this will be when you can begin playing around with your newly created boot, deciding to hide or unhide the polygons from it, and to determine which parts to add subdivision surface information.
This aspect of ZBrush is just like making a masterpiece in 3D Studio Max. It all comes down to sculpting details onto the model, so it has a plausible look once it is revealed later. A new PolyGroupIt will pop open with the boot inside PolyGroupIt.
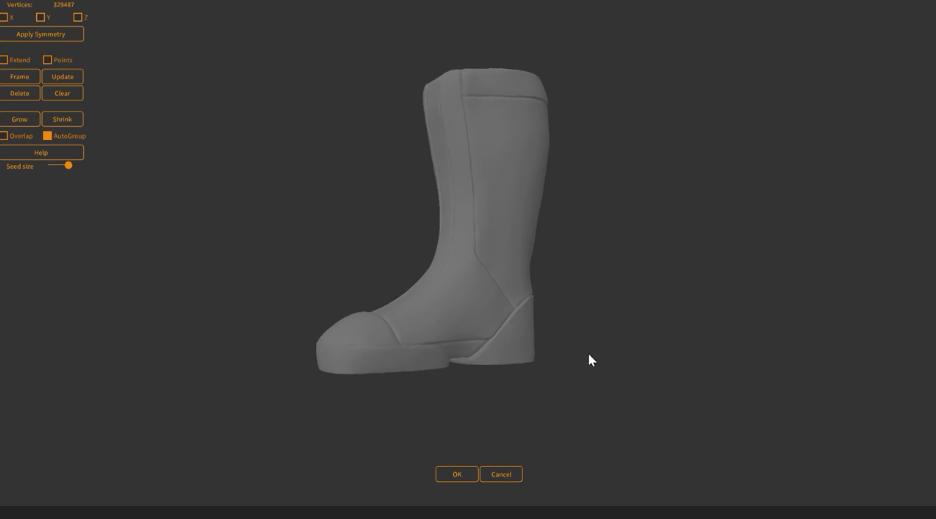
There are many new features in ZBrush. The idea of PolyGroupIt is that you touch your surface, and a graph pops up on the screen. You can see the seed for this graph, and below that, you have a slider. You can slide that slider to change your polygons.
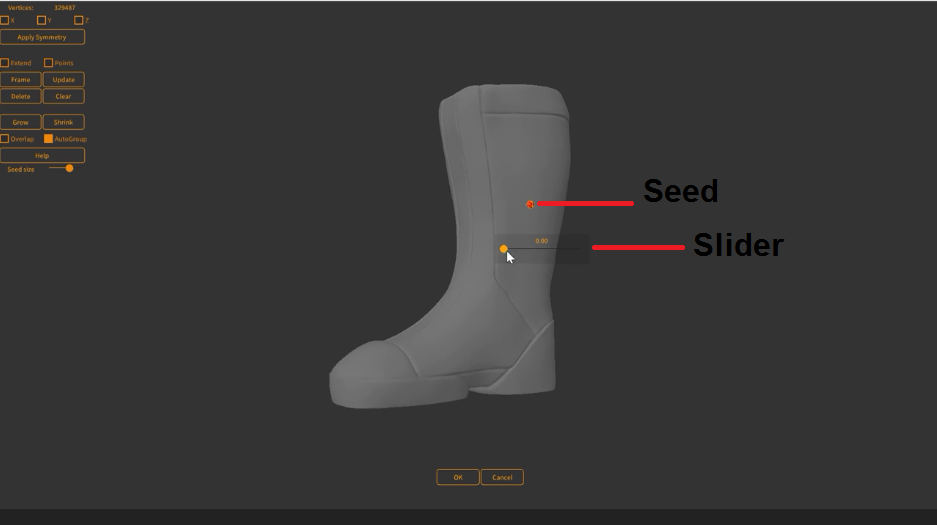
If you move the slider a little bit more to the right, you can see that the poly group is growing. And of course, if you move completely to the right, it'll cover the entire boot. You can move it back to the left and limit this poly grouping.
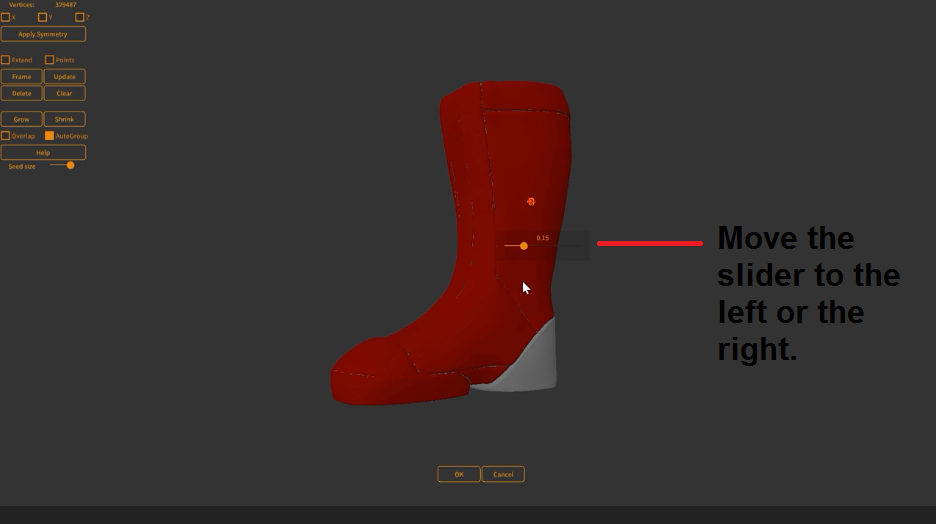
When you press and hold down on the sphere's surface, a group is created around that point.
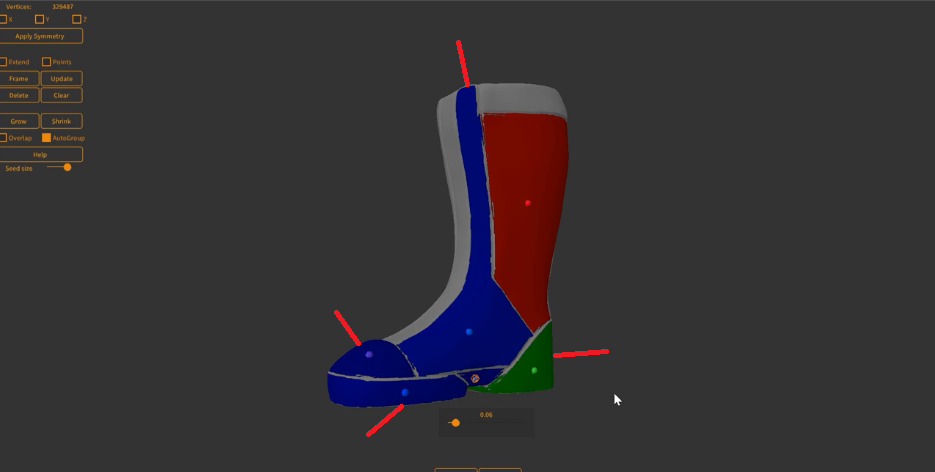
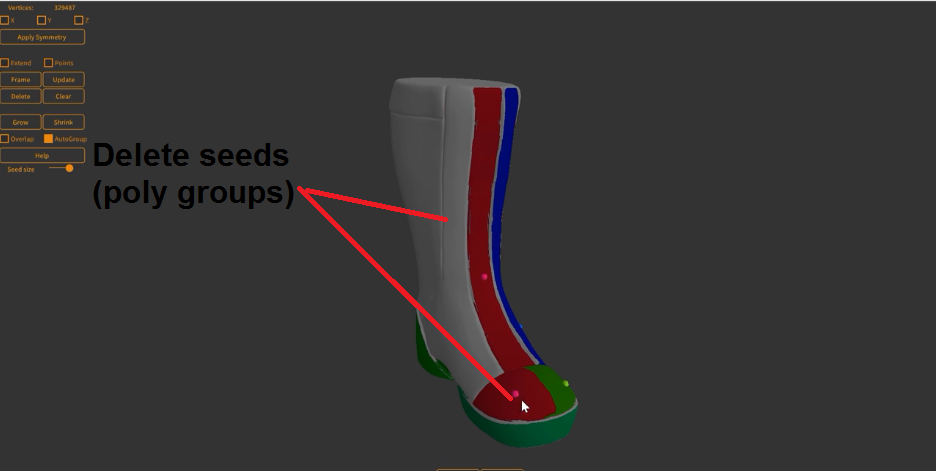
To delete one of these polygroups or seeds, you can use the Delete key in the top left-hand corner of the UI. You can see that the selected polygroup has now been deleted.
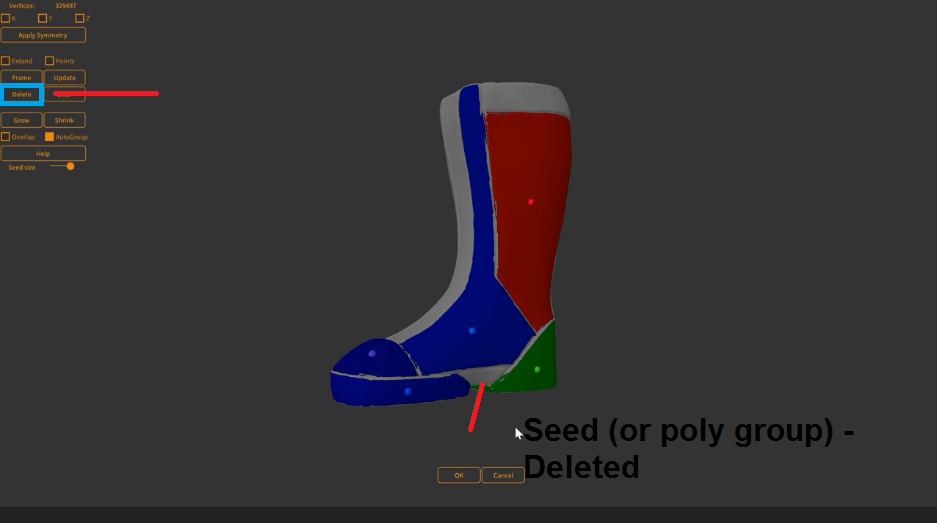
The alternative option is to hold the alt key, double-tap on polygon seed, and press delete.
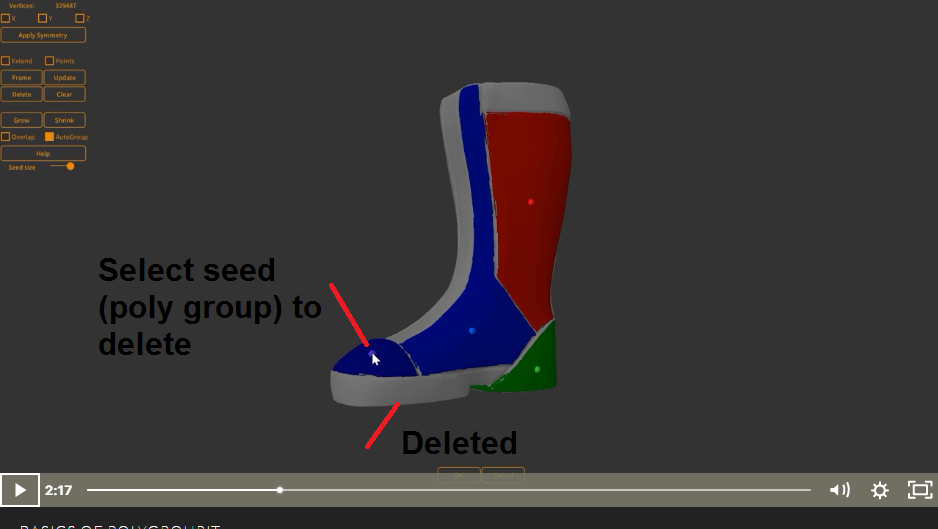
This plugin allows you to click any vertex, edge, surface, or poly to assign it to a poly group. You can even paste the selection from one mesh to another mesh.
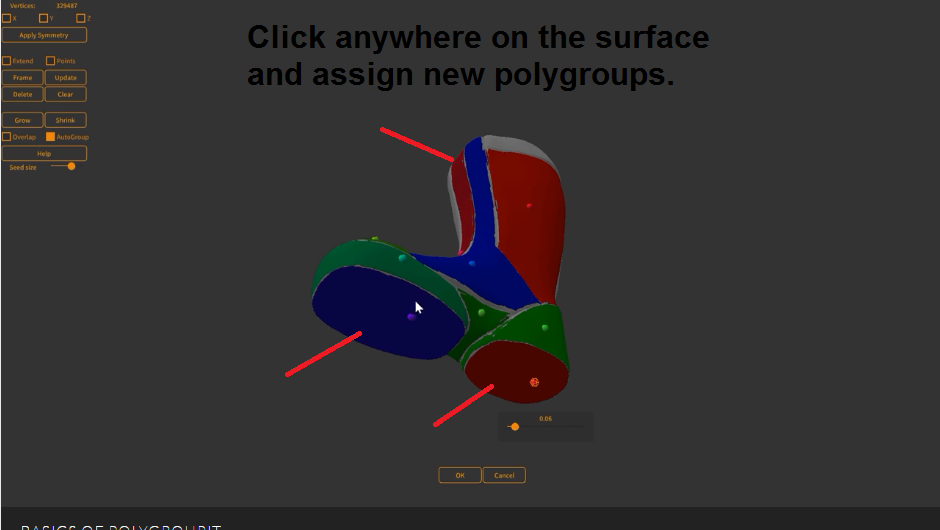
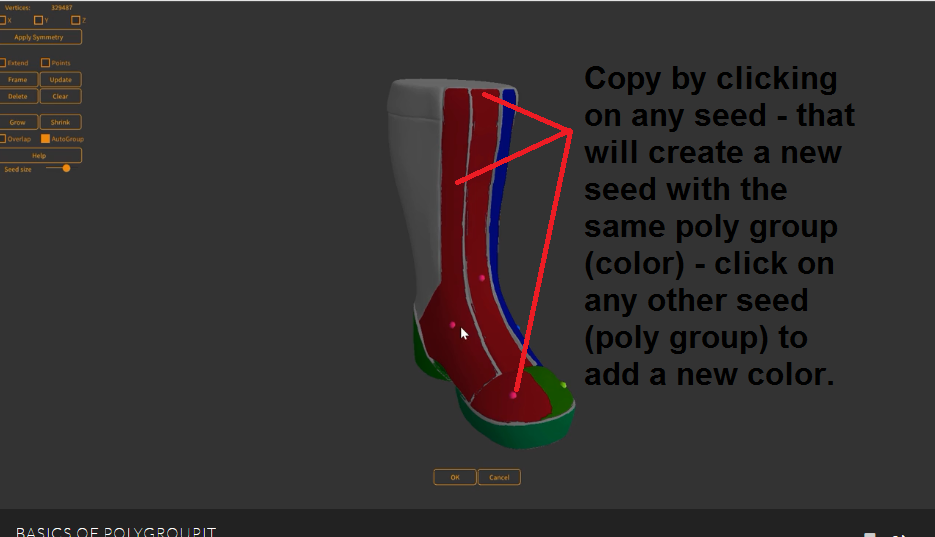
To choose an existing color, click on the seed you want to copy. While still holding down the CTRL key, click where you wish to create new seeds. All of them will have the same color as the original one.
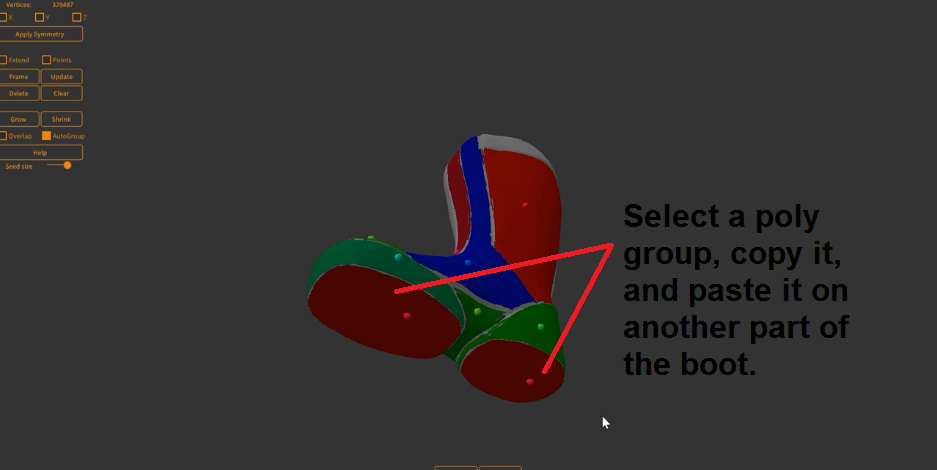
You can copy them when working with pasted objects by holding down the control key and tapping the C key. This method will create a new object that has the same poly group.
You can go ahead and delete those PolyGroups by holding Alt and double-tapping on the seeds.
To shrink a poly group, select PolyGroups>Shrink Selection. Select all polygons in your poly group, then click on Shrink Selection. ZBrush will automatically try to fit all of your polygons within the bounding box you outlined for the shrink selection.
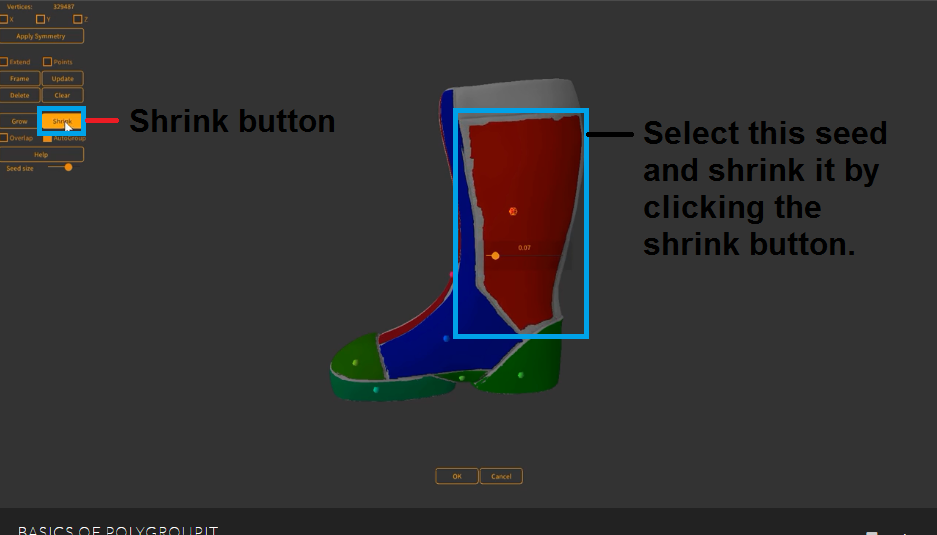
A common question is how you can make a polygroup larger or smaller. There are four methods:
-
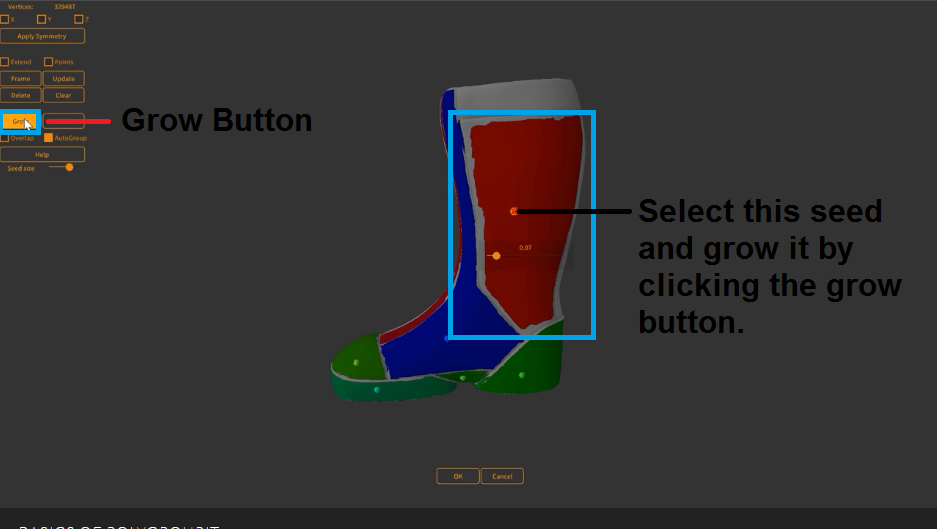
Grow it by selecting the seed (poly group), and you can grow it using Control + Shift + X . You will see that the polygroup has grown from its center. This method is called "Grow from Center."
-
You can either use control shift and x to grow or control shift and s to shrink.
-
You can also use the up arrow key to grow or the down arrow key on your keyboard to shrink.
-
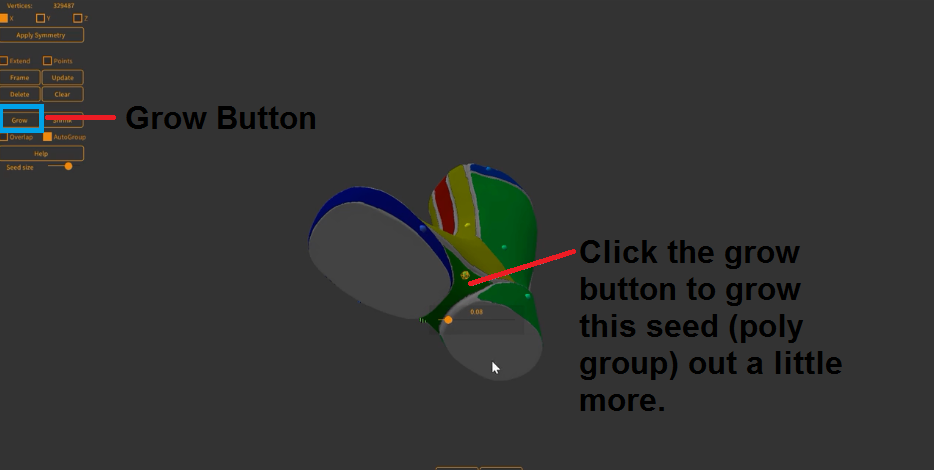
The last method is to click the grow button in the left panel. The great thing is that when you use any of these four methods, the polygroups will grow/shrink relative to their local axes, not relative to the object's global axes. That's very important in sculpting because you want your polygroups in their proper relative positions as they grow/shrink.
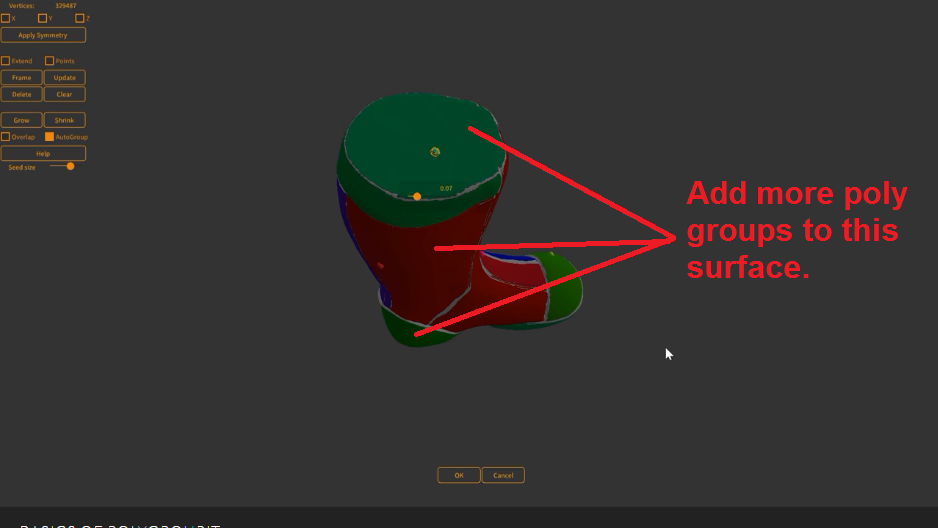
You're going to continue by just adding some more poly groups to this surface. As you can see, growing and shrinking each poly group could take some time.
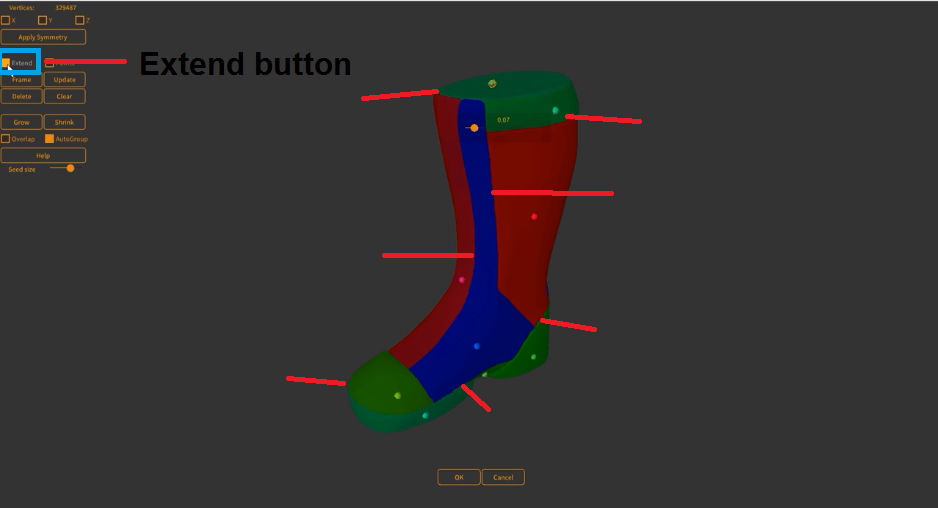
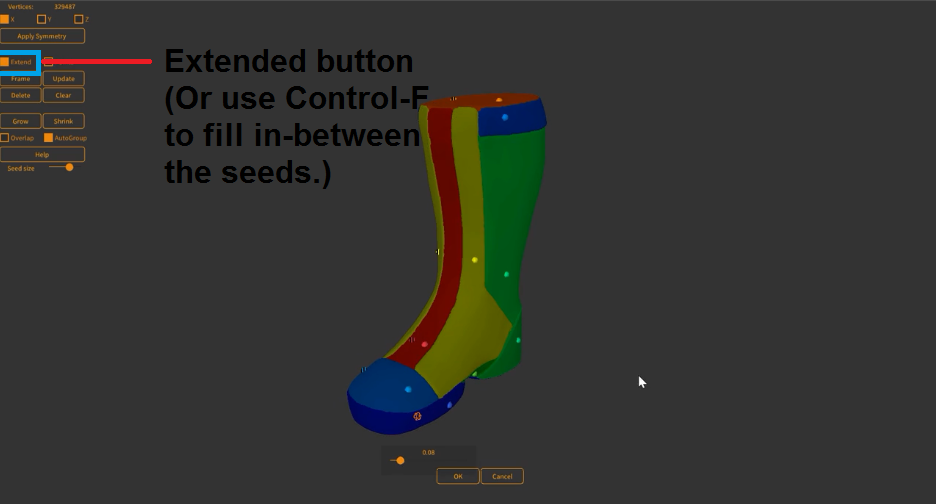
Why is this feature useful? It makes manipulating your models a little bit easier. With that said, you're going to turn off the extended options again here. When you activate PolyGroupIt, every single polygon on every object will extend beyond its normal boundaries until they meet another polygon. It simply extends a selection of polygons until they collide with another group. You can use a shortcut to do the same function, Control F. Control F turns it on and off.
When you hold the control key on your keyboard, the UI elements have a little help pop-up menu showing their available shortcut keys. This feature will help those not used to the shortcut system in ZBrush.
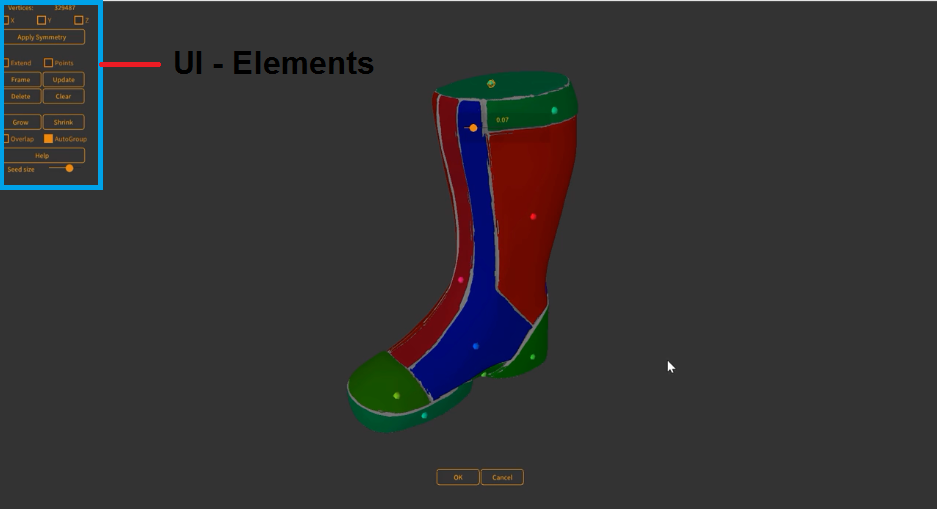
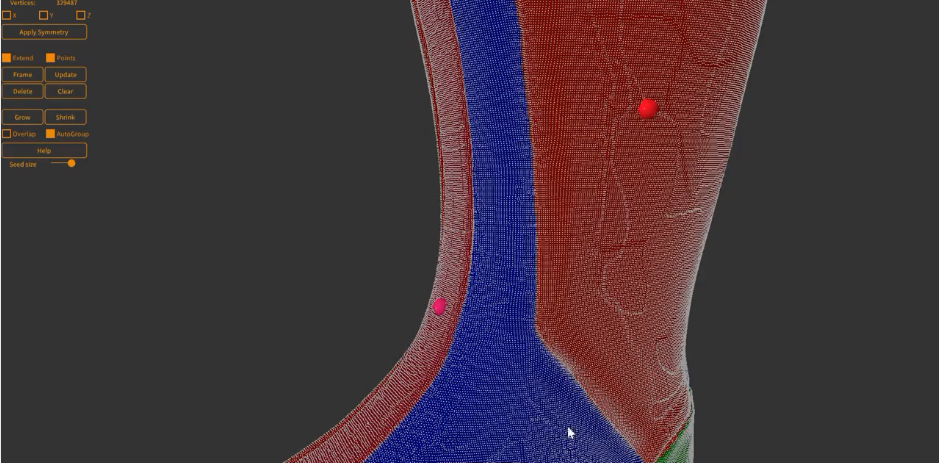
Go ahead and extend those polygroups so that they fill all the surfaces.At any point in time, if you would like to see the vertex points that make up your model, you can click on the vertex points. This method can be useful to know the model's topology to understand why a seed color is spreading a certain way.
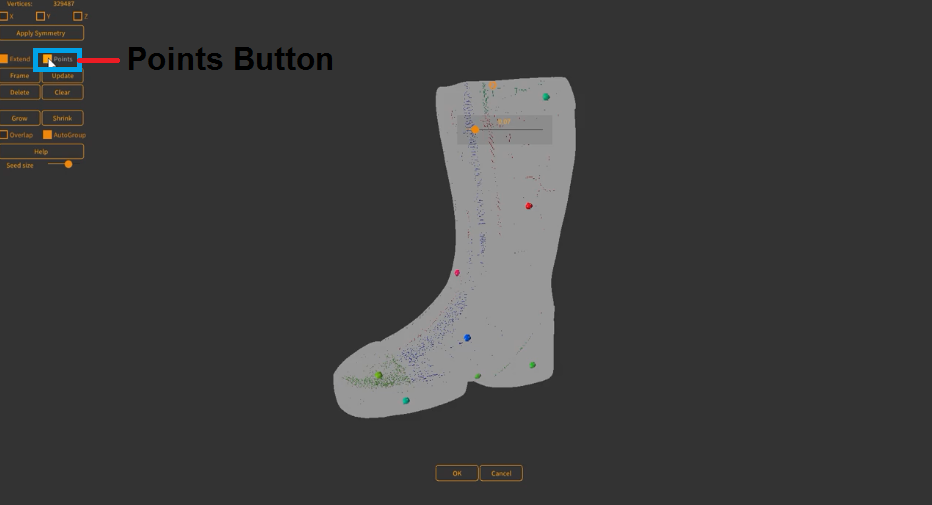
Shift F is to turn layers of our mesh off or on. You Can also see or hide them by using our renderers, so again really powerful.
Once you're happy with the boot figure, click the "Okay" button to apply this new version to your model.
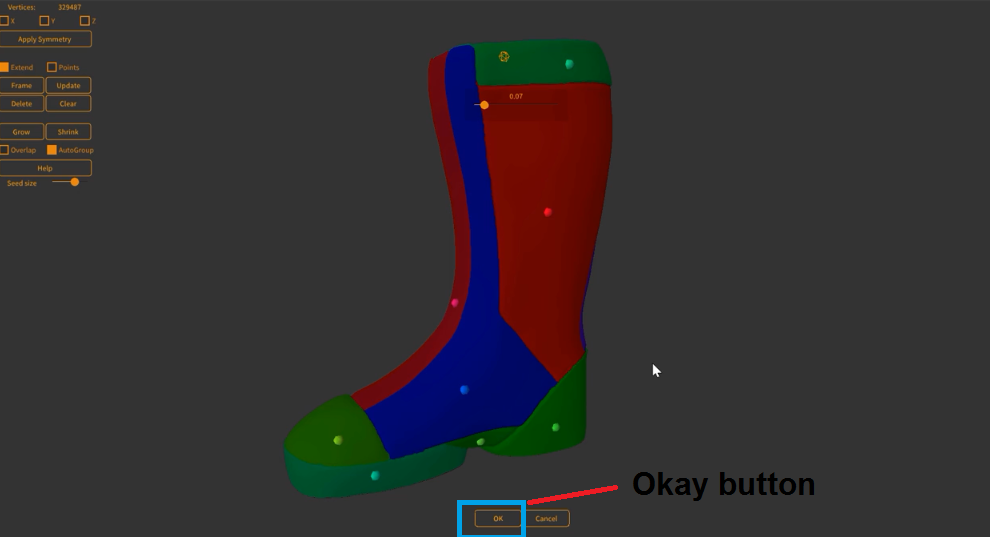
The figure is back into Z brush with the assigned polygroups.
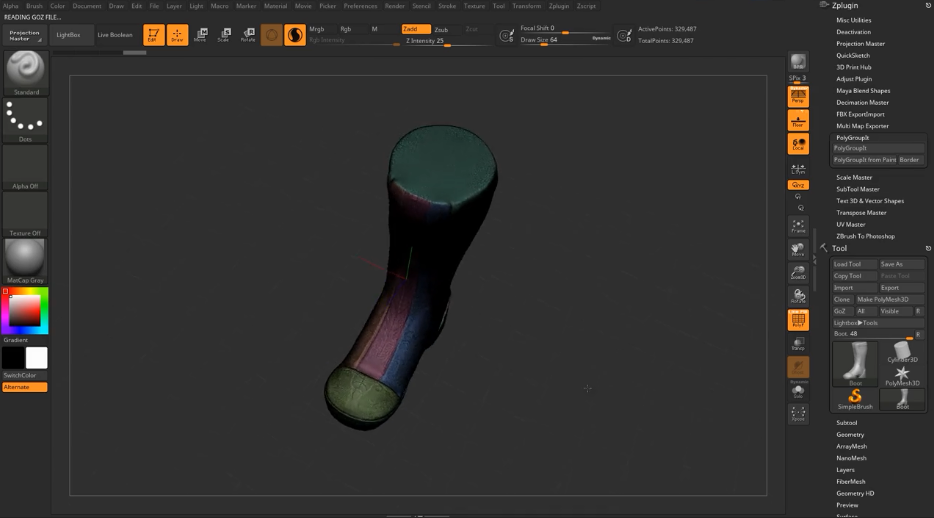
Click on the polygons at the bottom of the boot by holding down the Control key while tapping. You can see the sole of the boot has the same poly groups (color) from where you pasted it.
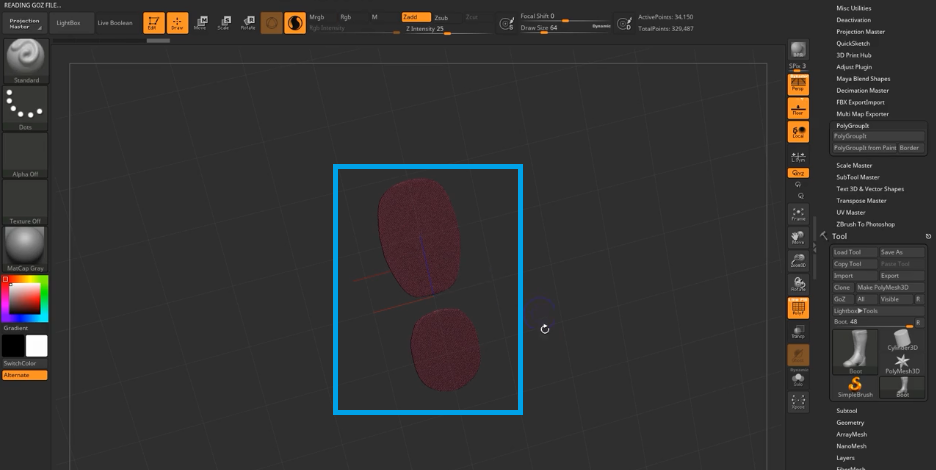
You can now return to the polygroup and examine some other options.
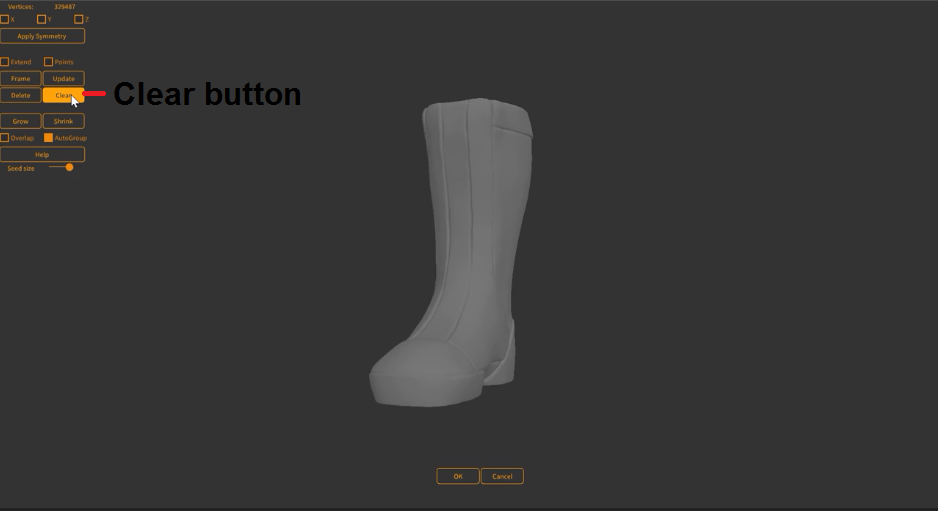
When you jump back into PolyGroupIt, you still have maintained the poly groups that were assigned originally. You're going to erase or delete all of them. You can do that by clicking the clear button (delete key). Now you have no poly groups assigned to this boot at all.
PolyGroupIt is a very simple plugin used to generate symmetrical or asymmetrical Seed Points for the standard symmetry mode in ZBrush. Once the seed points have been created, clicking on the button will create PolyGroups by mirroring the mesh with the X, Y, or Z-axis.
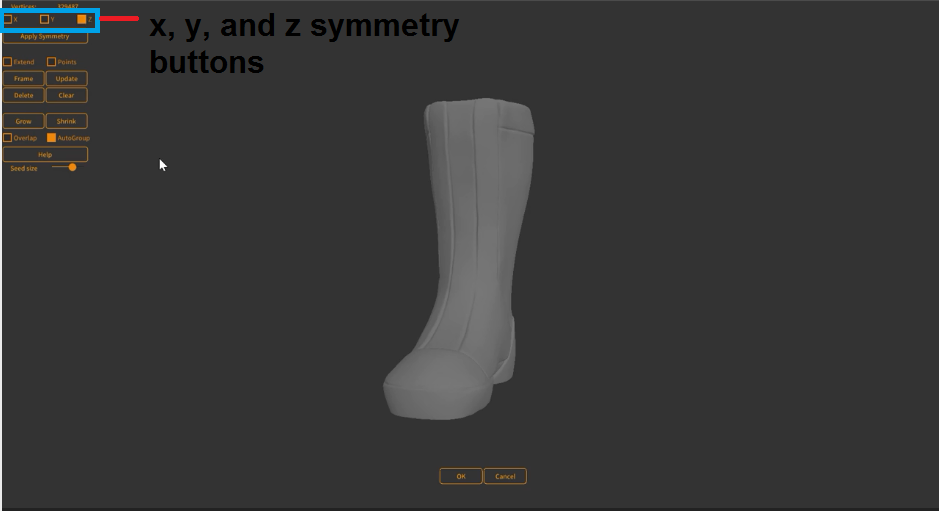
Click on the x symmetry button. The x symmetry will copy the entire model and mirror it on the other side of the X-axis. You have a poly group on both sides.
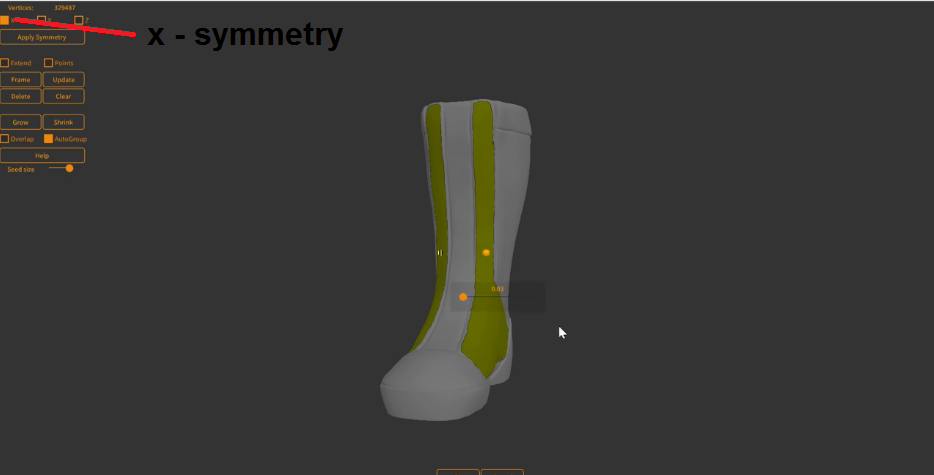
We found that PolyGroupIt was a fast and accurate way to create symmetrical details such as eyes, hands, and mouth in a snap. You don't need to worry about making symmetry points as it's an automatic process, and when you place a seed point at 0,0,0, the tool will place every polygon at the same location on the opposite side of the model.
Notice that this seed is the only one that you need to edit. It's not necessary to edit the other symmetrical seed as mentioned above.
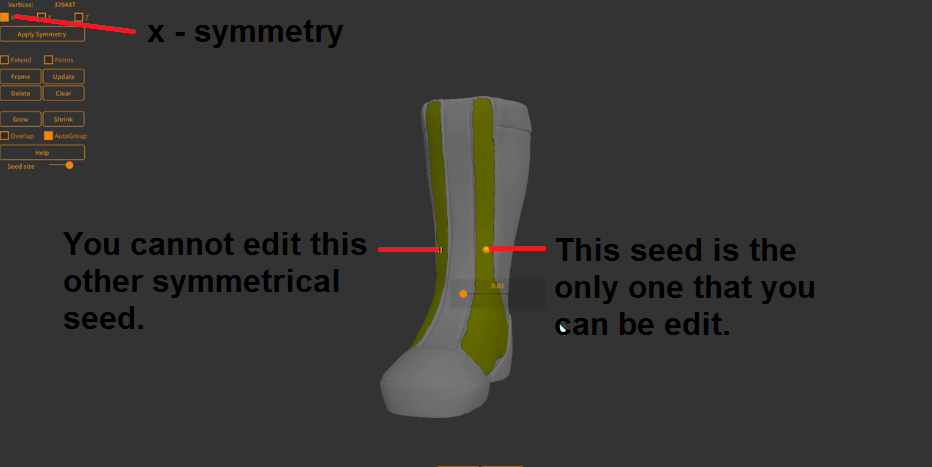
You can keep planting seeds and have symmetry.
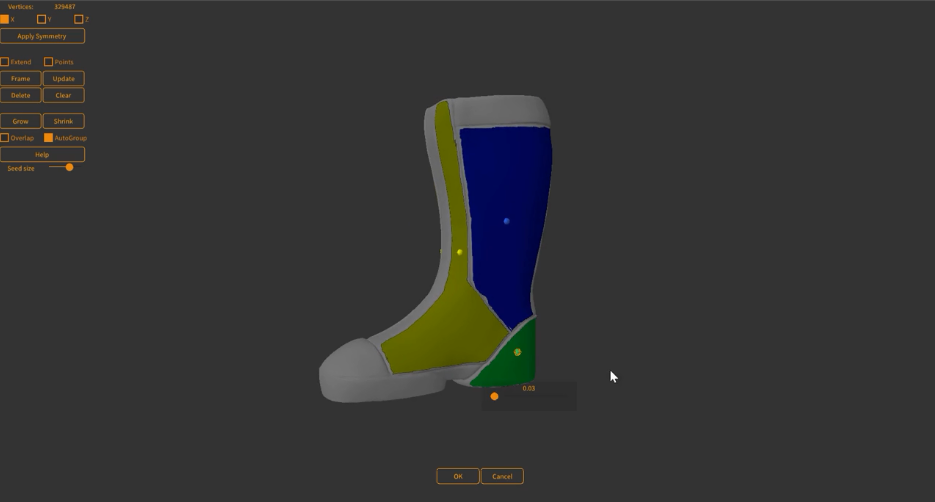
If you want to move seeds around, you can click and drag. You can see that we've just moved that seed to the top. Move seeds easy with a click and then dragging anywhere else. We can move those seeds around.
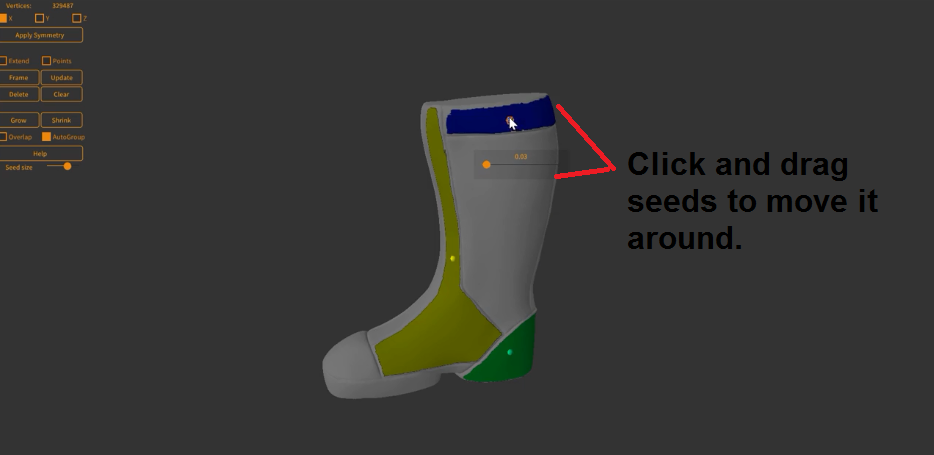
Let's continue clicking and adding more seeds. These seeds are symmetrical.
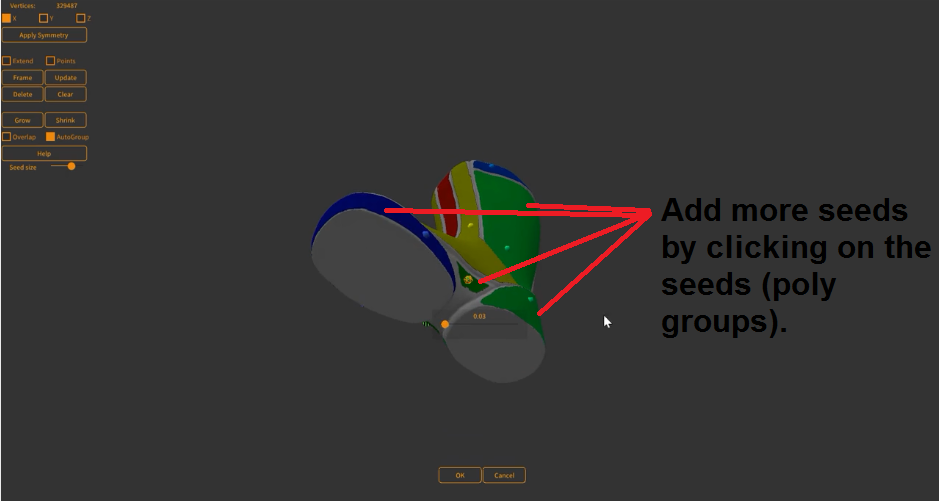
Let's grow that one out a little bit more. You've got some symmetrical poly grouping on either side.
Once your model is selected, press Control + F on the keyboard or click the extended button.
It's unnecessary to turn these symmetrical seeds into editable ones, but we can do that by clicking the apply symmetry button, and the shortcut for this is A.
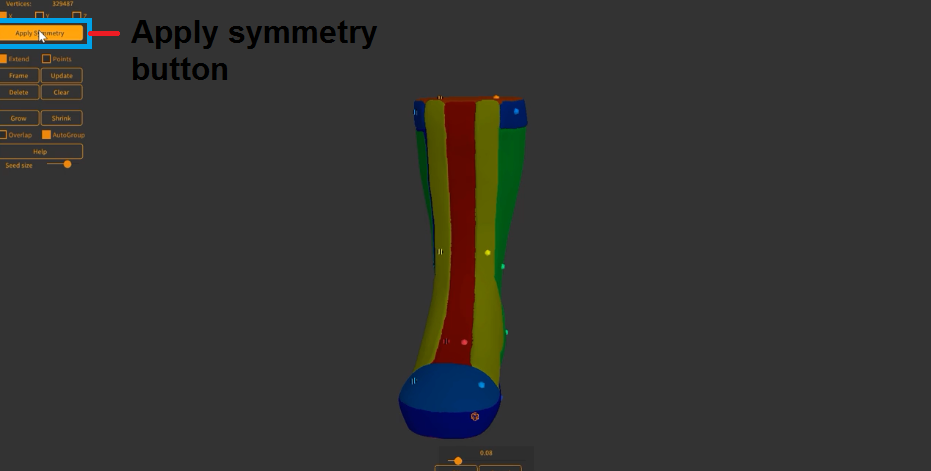
After that, you can now click on the side of the symmetrical seed where you used to edit only one side. This step is unnecessary, but editing both sides may be useful in some situations.
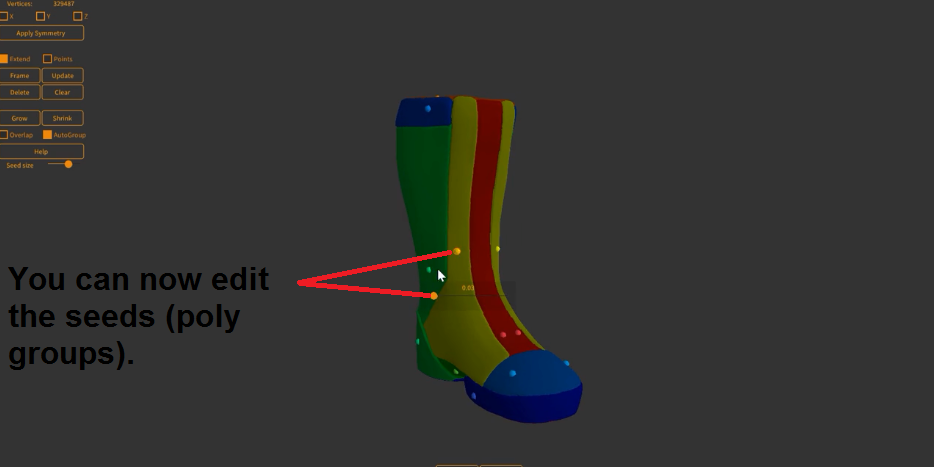
When you click the Okay button at the bottom of the screen, you'll see a dialog box informing you that your symmetry poly groups have updated your boot model in ZBrush. The ZBrush Boot is now ready to be used with any other features found in ZBrush.
Conclusion
With these simple tools and brushes, you can save loads of time when making symmetrical sculpts. Poly Group It is a revolutionary plugin to use inside ZBrush. The Polygroup tool allows you to group different parts for later authoring.
For example, creating eight trunks of a palm tree, grouping them, and making the branches from the trunk group. This way, it's much faster if you want to add some variation to the branches' scaling or add new details.
With GoZ, you can use ZBrush to go from a 3D model to a glTF file and then export it so that you can upload it in p3d.in, letting you create your shared 360-degree environment.
Hopefully this saves you some time and energy. Thanks for reading this tutorial!